For build arguments, annotations, and the complete build-hints table, see Build hints reference.
Versioned builds
By default a cloud build always uses the current Codename One release. With a versioned build you can instead pin the build to a specific previously released framework version, so you get reproducible output over time. This helps when stabilizing a release, supporting an older app, or isolating a regression: if an app that built correctly in the past starts failing, rebuilding against the last known good version tells you whether the change came from your code or from the framework and build server.
Set the build.cn1Version build hint to the version you want to target. Versions use the standard Maven release scheme, for example 7.0.182:
codename1.arg.build.cn1Version=7.0.182
The build server fetches that version’s framework artifacts from the Codename One Maven repository and builds against them, falling back to Maven Central for releases published before the move. To keep your simulator and local compile classpath aligned with the same release, set the matching cn1.version in your project pom.xml.
Versioned builds are a Pro and Enterprise feature, and how far back you can target depends on the subscription tier:
| Tier | Versions you can target |
|---|---|
Pro | Any version released within the last two months |
Enterprise | Any version released within the last six months |
If you request a version older than your tier’s window, a version that was never published, or you aren’t on a Pro or Enterprise plan, the build fails with an explanatory message instead of falling back to the current release.
Building against master
Set build.cn1Version to master to build against the current development head (the latest master of the Codename One repository) instead of a released version:
codename1.arg.build.cn1Version=master
Every push to master publishes a fresh set of framework artifacts and the build server always grabs the latest, so this is the quickest way to verify an unreleased fix or feature end to end on a device. Because master tracks active development it can be less stable than a release, so use it for verification rather than for shipping production builds. Building against master is available to Pro and Enterprise subscribers.
Android permissions
One of the annoying tasks when programming native Android applications is tuning all the required permissions to match your codes requirements, Codename One aims to simplify this. The build server automatically introspects the classes sent to it as part of the build and injects the right set of permissions required by the app.
For example, sometimes developers might find the permissions that come up a bit confusing and might not understand why a specific permission came up. This maps Android permissions to the methods/classes in Codename One that would trigger them. Notice that this list isn’t exhaustive as the API is rather large:
android.permission.WRITE_EXTERNAL_STORAGE - included by default (up to Android 13) so file APIs continue to work unless you block it with android.blockExternalStoragePermission=true.
android.permission.INTERNET - always requested because the networking stack depends on it even for offline features like local web views.
android.permission.CAMERA & android.permission.RECORD_AUDIO - required when capturing photos, video, or audio. The builder injects them automatically and the Android port prompts the user the first time the API is used.
android.permission.READ_PHONE_STATE - used by telephony-aware APIs like Display.getMsisdn() and by media integration so audio pauses on calls.
android.permission.ACCESS_FINE_LOCATION & android.permission.ACCESS_COARSE_LOCATION - requested when using com.codename1.location or embedded maps so location fixes can be delivered.
android.permission.ACCESS_BACKGROUND_LOCATION - added when background geofencing or fetch tasks are enabled; the Android port verifies the permission on Android 10+.
android.permission.POST_NOTIFICATIONS - prompted on Android 13+ for both push registration and local notifications.
package.permission.C2D_MESSAGE, com.google.android.c2dm.permission.RECEIVE, and android.permission.RECEIVE_BOOT_COMPLETED - bundled with the push subsystem so Firebase Cloud Messaging can wake the app after device restarts.
android.permission.READ_CONTACTS - requested when accessing the device address book through Display.getAllContacts() and related APIs.
android.permission.READ_MEDIA_VIDEO & android.permission.READ_MEDIA_AUDIO - added on API 33 and above when the app plays a URI through MediaManager.createMedia(String, boolean) or createMediaAsync(String, boolean, Runnable), since that URI can point at the shared media store. The InputStream overloads don’t add them: the Android port copies the stream into app private storage and reads nothing shared. Block them with android.blockReadMediaPermissions=true.
android.permission.READ_MEDIA_IMAGES - never added by media playback, because no Codename One API requests it at runtime. Declaring it alongside READ_MEDIA_VIDEO places the app under Google Play’s Photo and Video Permissions policy, so ask for it only when you need it, with android.requestReadMediaPermissions=true.
Permissions under Marshmallow (Android 6+)
Starting with Marshmallow (Android 6+ API level 23) Android shifted to a permissions system that prompts users for permission the first time an API is used for example: when accessing contacts the user will receive a prompt whether to allow contacts access.
This is great as it allows apps to be installed with a single click and no permission prompt during install which can increase conversion rates!
Enabling permissions
By default, Codename One’s Gradle 8 based Android builder uses the highest Android SDK you’ve installed, with a minimum of API 36, for both the compile and target SDK versions. If you override the target through the android.targetSDKVersion build hint, the builder honors it while keeping the compile SDK at least as high as the target SDK. Lowering the target may disable some compatibility libraries. Keeping the target current is strongly recommended for Play Store compliance.
Permission prompts
To test this API see the following simple contacts app:
Form f = new Form("Contacts", BoxLayout.y());
f.add(new InfiniteProgress());
Display.getInstance().invokeAndBlock(() -> {
    Contact[] ct = Display.getInstance().getAllContacts(true, true, false, true, true, false);
    Display.getInstance().callSerially(() -> {
        f.removeAll();
        for (Contact c : ct) {
            MultiButton mb = new MultiButton(c.getDisplayName());
            mb.setTextLine2(c.getPrimaryPhoneNumber());
            f.add(mb);
        }
        f.revalidate();
    });
});

f.show();
If you explicitly lower the target SDK (for example: android.targetSDKVersion=21) and install this app on an Android 6 device you will still see the legacy install prompt with all permissions listed up front:
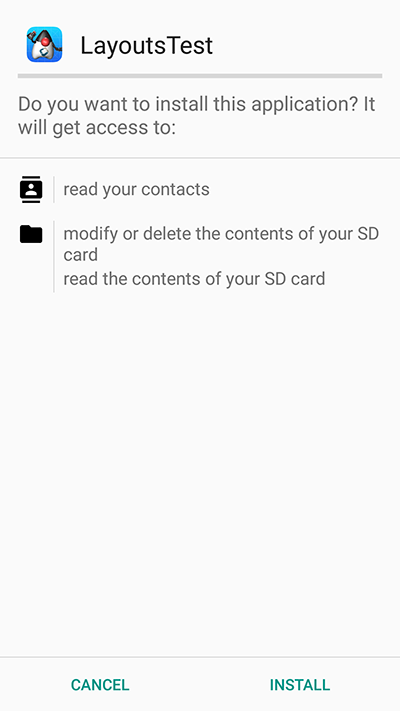
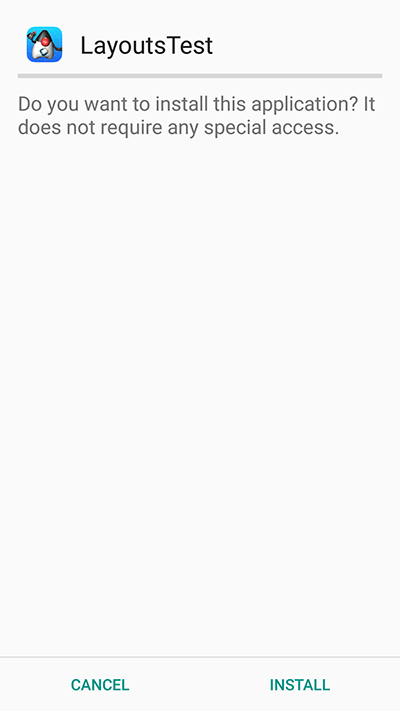
When you keep the default target (API 36+) the installer defers to the runtime permission flow and the installation UI looks like this instead:
When you launch the UI under the old permissions system you see the contacts instantly. In the new system you’re presented with this UI:
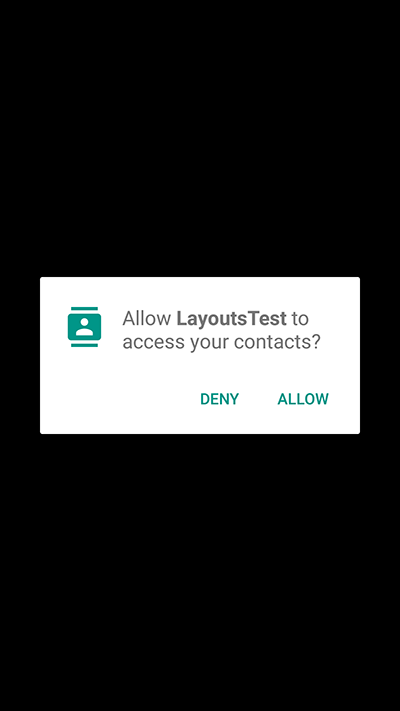
If you accept and allow all is good and the app loads as usual but if you deny then Codename One provides the user another chance to request the permission. Notice that in this case you can customize the prompt string as explained below.
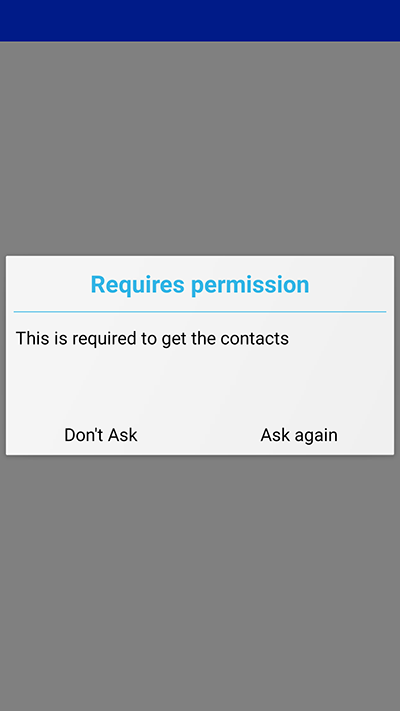
If you select don’t ask then you will get a blank screen since the contacts will return as a 0 length array. This makes sense as the user is aware he denied permission and the app will still function as expected on a device where no contacts are available. For example, if the user realizes his mistake he can double back and ask to re-prompt for permission in which case he will see this native prompt:
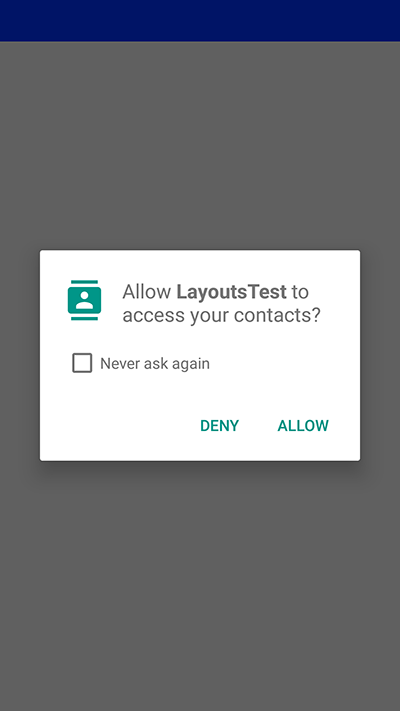
Notice that denying this second request won’t trigger another Codename One prompt.
Code changes
No explicit code changes needed for this functionality to "work." The respective APIs will work like they always worked and will prompt the user seamlessly for permissions.
When permission is requested a user will be seamlessly prompted/warned. You can customize the permission text through Display properties. For example: to customize the rationale text of the contacts permission:
Display.getInstance().setProperty(
        "android.permission.READ_CONTACTS",
        "MyCoolChatApp needs access to your contacts so we can show you which of your friends already have MyCoolChatApp installed");
The Android port also checks UIManager.localize() for localized values before falling back to Display properties. You can provide localized strings for the permission body and dialog buttons/title using keys based on the permission name:
com.codename1.ui.plaf.UIManager.getInstance().setBundle(new java.util.Hashtable<String, String>() {{
    put("android.permission.READ_CONTACTS", "Localized rationale for contacts");
    put("android.permission.READ_CONTACTS.title", "Localized permission title");
    put("android.permission.READ_CONTACTS.askAgain", "Localized ask again");
    put("android.permission.READ_CONTACTS.dontAsk", "Localized don't ask");
}});
For example, if the permission key is android.permission.READ_CONTACTS, you can localize these keys:
android.permission.READ_CONTACTS(dialog body)android.permission.READ_CONTACTS.titleandroid.permission.READ_CONTACTS.askAgainandroid.permission.READ_CONTACTS.dontAsk
The same pattern applies to other permissions. android.permission.ACCESS_BACKGROUND_LOCATION also supports:
android.permission.ACCESS_BACKGROUND_LOCATION.settings,
android.permission.ACCESS_BACKGROUND_LOCATION.cancel,
android.permission.ACCESS_BACKGROUND_LOCATION.explanation_title,
android.permission.ACCESS_BACKGROUND_LOCATION.explanation_body, and
android.permission.ACCESS_BACKGROUND_LOCATION.ok.
This is optional as there is a default value defined. You can define this once in the init(Object) method but for some extreme cases permission might be needed for different things for example: you might ask for this permission with one reason at one point in the app and with a different reason at another point in the app.
Simulating prompts
You can simulate permission prompts by checking that option in the simulator menu.
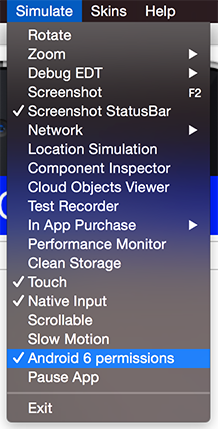
This will produce a dialog to the user whenever this happens in Android and will try to act in a similar way to the device. Notice that you can test it in the iOS simulator too.
AndroidNativeUtil’s checkForPermission
If you write Android native code using native interfaces you’re probably familiar with the AndroidNativeUtil class from the com.codename1.impl.android package.
This class provides access to many low-level capabilities you would need as a developer writing native code. Since native code might need to request a permission Codename One uses the same underlying logic, namely:
checkForPermission.
To get a permission you can use this code as such:
if (!AndroidNativeUtil.checkForPermission(
        android.Manifest.permission.READ_PHONE_STATE,
        "This should be the description shown to the user...")) {
    // you didn't get the permission, you might want to return here
}
// you have the permission, do what you need
This will prompt the user with the native UI and later on with the fallback option as described above. Notice that the checkForPermission method is a blocking method and it will return when there is a final conclusion on the subject. It uses invokeAndBlock and can be invoked on the event dispatch thread without concern.
By default, fallback prompts are displayed using Codename One’s Dialog.show(…). If you’re writing native Android code and need to use your own prompt implementation, you can install a custom callback:
AndroidNativeUtil.setPermissionPromptCallback(new PermissionPromptCallback() {
    @Override
    public boolean showPermissionPrompt(String permission, String title, String body, String positiveButtonText, String negativeButtonText) {
        return com.codename1.ui.Dialog.show(title, body, positiveButtonText, negativeButtonText);
    }

    @Override
    public void showPermissionMessage(String permission, String title, String body, String okButtonText) {
        com.codename1.ui.Dialog.show(title, body, okButtonText, null);
    }
});
Pass null to AndroidNativeUtil.setPermissionPromptCallback() to restore the default behavior.
On device debugging
On-device debugging now has two dedicated chapters, one per platform:
On-Device Debugging (iOS) covers attaching a standard Java debugger (IntelliJ, jdb, VS Code) to an iOS app running on a device or in the native iOS simulator, as well as debugging the generated Xcode project natively.
On-Device Debugging (Android) covers the equivalent adb/JDWP-based flow for Android devices and emulators, including wireless debugging and debugging the generated Gradle project from Android Studio.
Native interfaces
Sometimes you may wish to use an API that’s unsupported by Codename One or integrate with a 3rd party library/framework that isn’t supported. These are achievable tasks when writing native code and Codename One lets you encapsulate such native code using native interfaces.
Introduction
Notice that when you say "native" you don’t mean C/C++ always but rather the platforms "native" environment. For Android, Java or Kotlin code can be invoked with full access to the Android API. In case of iOS, Objective-C or Swift code can be invoked and so forth.
Native interfaces are designed to allow primitive types, Strings, arrays of primitive types (single dimension ) & PeerComponent values. Any other kind of parameter/return type is prohibited. For example, once in the native layer the native code can act and query the Java layer for more information.
Object to an Objective-C NSObject is possible but leads to odd edge cases and complexity for example: GC vs. ARC in a disparate object graphFurthermore, native methods should avoid features such as overloading, varargs (or any Java 5+ feature for that matter) to allow portability for languages that don’t support such features.
The shape is always the same, whether you are reaching one platform API or
wrapping a whole third party SDK. Portable Java sits on one side, your
per-platform implementation class on the other, and between them a narrow
interface carrying only the types listed above: primitives, strings, single
dimension primitive arrays and PeerComponent values. Nothing calls the vendor’s
SDK except that implementation class.
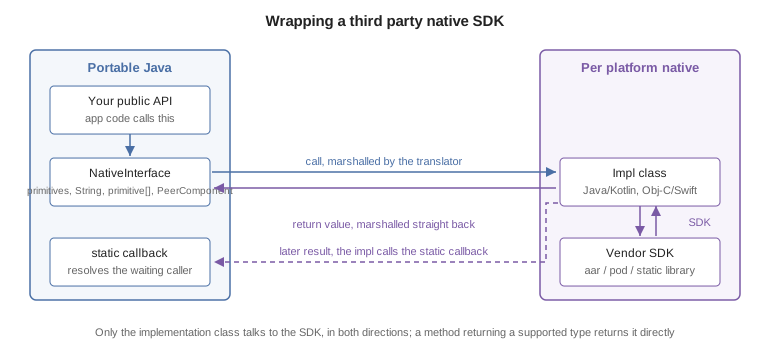
A method that returns one of those types returns it directly — the value is
marshalled back the same way the arguments went out. The return path only gets
interesting when the work finishes later: a native SDK that answers through its
own callback has nothing to return by then, so it calls a static method on the
Java class instead, and that method resolves whatever the caller was waiting on. Integrating Android 3rd party libraries & JNI
covers bundling the vendor binary on Android, ios.pods does the same for iOS,
and Libraries - cn1lib covers shipping the result as a library.
Implementing a native layer effectively means:
Creating an interface that extends NativeInterface and defines methods with the arguments/return values declared in the previous paragraph.
Creating the proper native implementation hierarchy based on the call conventions for every platform, in each platform module’s own source directory
For example: to create a simple hello world interface do something like:
public interface MyNative extends NativeInterface {
    String helloWorld(String hi);
}
You now need to right-click the class in the IDE and select the Generate Native Access menu item:
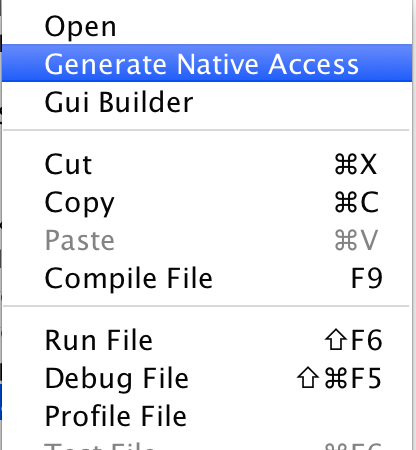
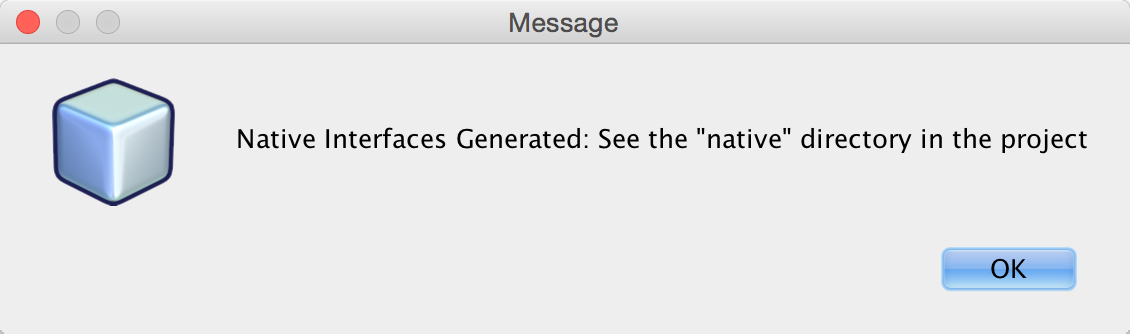
You can now look int the native directory in the project root (in NetBeans you can see that in the Files tab) and you can see something that looks like this:
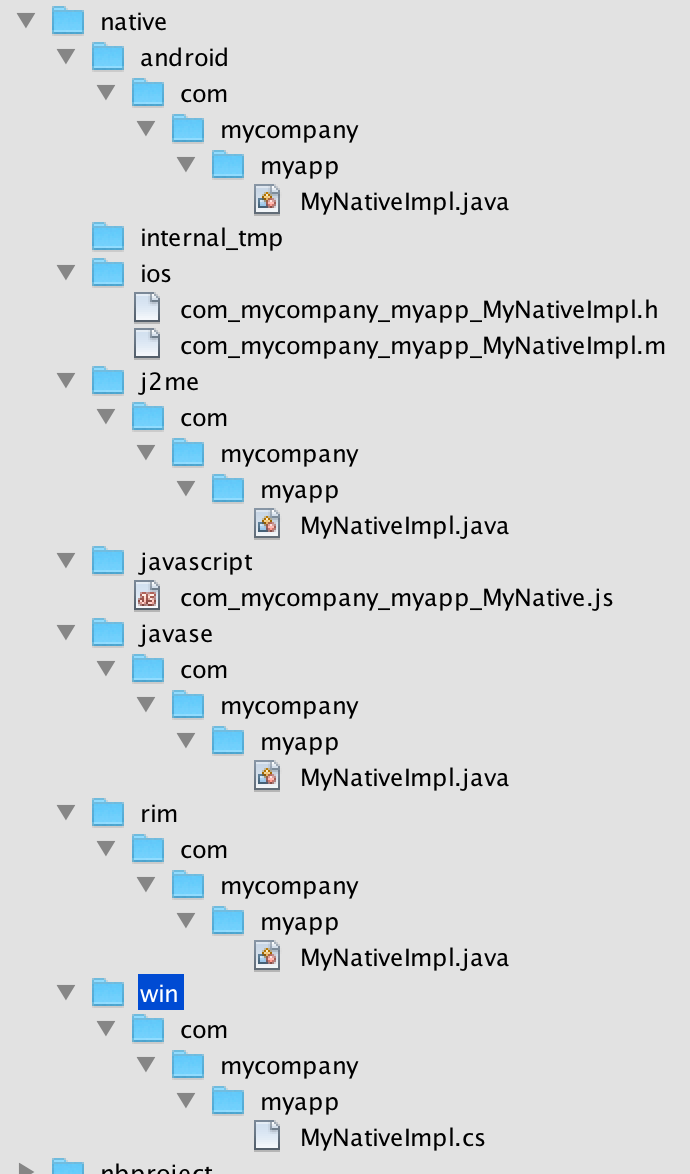
These are effectively stubs you can edit to implement the methods in native code.
For now lets leave the stubs and come back to them soon. From the Codename One Java code you can call the implementation of this native interface using:
MyNative my = NativeLookup.create(MyNative.class);
if (my != null && my.isSupported()) {
    Log.p(my.helloWorld("Hi"));
}
Notice that for this to work you must implement the native code on all supported platforms.
You will start with Android which should be familiar and intuitive to many developers. The helper MyNativeImplStub class below mirrors the stub that the tooling generates under android/src/main/java:
class MyNativeImplStub {
    public String helloWorld(String param) {
        return null;
    }

    public boolean isSupported() {
        return false;
    }
}
The stub implementation always returns false, null or 0 by default. The isSupported also defaults to false thus allowing you to implement a NativeInterface on some platforms and leave the rest out without knowing anything about these platforms.
You can implement the Android version in Java or Kotlin. Here is the Java version:
public class MyNativeImpl { // (2) (3)
    public String helloWorld(String param) {
        Log.d("MyApp", param); // (1)
        return "Tada";
    }

    public boolean isSupported() {
        return true; // (4)
    }
}
Notice that you’re using the Android native
android.util.Logclass which isn’t accessible from standard Codename One codeThe impl class doesn’t physically implement the
MyNativeinterface!
This is intentional and due to thePeerComponentfunctionality mentioned below. You don’t need to add an implements clause.Notice that there is no constructor and the class is public. It’s crucial that the system will be able to assign the class without obstruction. You can use a constructor but it can’t have any arguments and you shouldn’t rely on semantics of construction.
The native method is implemented, and
isSupportedanswers true.
Codename One doesn’t include the native platforms in its bundle for example: the full Android SDK or the full Xcode Objective-C runtime. For example, since the native code is compiled on the servers (where these runtimes are present) this shouldn’t be a problem
The implementation of this interface is identical for Android (Java/Kotlin) & Java SE.
Swift (iOS) and Kotlin (Android) options
For iOS native interfaces you can implement the generated …Impl class in Objective-C or Swift.
For Android native interfaces you can implement the generated …Impl class in Java or Kotlin.
In a Maven project the directories below hold the native code whether the project has a module for that platform or not. mvn cn1:generate-native-interfaces creates them as needed, and a project without the platform’s module builds them from the common module (see Projects without platform modules).
| Platform | Maven project | Gradle project |
|---|---|---|
Android (Java/Kotlin) |
|
|
iOS (Objective-C/Swift) |
|
|
Java SE (simulator and desktop) |
|
|
Native Windows (win32, C) |
|
|
Native Linux © |
|
|
JavaScript |
|
|
A Gradle project creates each of these directories only when ./gradlew generateNativeInterfaces first writes a stub into it; see Native interfaces.
Use the Android main thread (native EDT)
iOS, Android & pretty much any modern OS has an EDT like thread that handles events etc. The problem is that they differ in their nuanced behavior. For example: Android will respect calls off of the EDT and iOS will often crash. Some OSes enforce EDT access and will throw an exception when you violate that…
You don’t need to know about these things, hidden functionality within your implementation bridges between your EDT and the native EDT to provide consistent cross-platform behavior. However, when you write native code you need awareness.
How do you access the native EDT
Within your native code in Android do something like:
com.codename1.impl.android.AndroidNativeUtil.getActivity().runOnUiThread(new Runnable() {
    public void run() {
       // your native code here...
    }
});
This will execute the block within run() asynchronously on the native Android UI thread. If you need synchronous execution you have a special method for Codename One:
com.codename1.impl.android.AndroidImplementation.runOnUiThreadAndBlock(new Runnable() {
    public void run() {
       // your native code here...
    }
});
This blocks in a way that’s OK with the Codename One EDT which is unique to your Android port.
Gradle dependencies
Integrating a native OS library isn’t hard but it sometimes requires some juggling. Most instructions target developers working with Xcode or Android Studio & you need to twist your head around them. In Android the steps for integration in most modern libraries include a Gradle dependency.
For example: you published a library that added support for Intercom. The native Android integration instructions for the library looked like this:
Add the following dependency to your app’s build.Gradle file:
dependencies {
    compile 'io.intercom.android:intercom-sdk:3.+'
}
Which instantly raises the question: "How do you do that in Codename One"?
Well, it’s actually pretty simple. You can add the build hint:
android.gradleDep=compile 'io.intercom.android:intercom-sdk:3.+'
This would "work" but there is a catch…
You might need to define the specific version of the Android SDK used and specific version of Google Play Services version used. Intercom is pretty sensitive about those and demanded that you also add:
android.playServices=9.8.0
android.sdkVersion=25
Once those were defined the native code for the Android implementation became trivial to write and the library was easy as there were no jars to include.
Objective-C and Swift (iOS)
When generating the Objective-C code the "Generate Native Sources" tool produces two files by default: com_mycompany_myapp_MyNativeImpl.h & com_mycompany_myapp_MyNativeImpl.m.
If you enable Swift stub generation in the Maven goal, it can also produce com_mycompany_myapp_MyNativeImpl.swift.
The .m files are the Objective-C equivalent of .c files and .h files contain the header/include information. In this case the com_mycompany_myapp_MyNativeImpl.h contains:
#import <Foundation/Foundation.h>

@interface com_mycompany_myapp_MyNativeImpl : NSObject {
}

-(NSString*)helloWorld:(NSString*)param;
-(BOOL)isSupported;
@end
And com_mycompany_myapp_MyNativeImpl.m contains:
#import "com_mycompany_myapp_MyNativeImpl.h"

@implementation com_mycompany_myapp_MyNativeImpl

-(NSString*)helloWorld:(NSString*)param{
    return nil;
}

-(BOOL)isSupported{
    return NO;
}

@end
-(NSString*)helloWorld:(NSString*)param isn’t the same as -(NSString*)helloWorld:(NSString*)iChangedThisName!don’t change argument names in the Objective-C native interface!
Here is a simple implementation like above:
#import "com_mycompany_myapp_MyNativeImpl.h"

@implementation com_mycompany_myapp_MyNativeImpl

-(NSString*)helloWorld:(NSString*)param{
    NSLog(@"MyApp: %@", param);
    return @"Tada";
}

-(BOOL)isSupported{
    return YES;
}

@end
If you prefer Swift for iOS native interfaces, keep the same class naming convention (com_mycompany_myapp_MyNativeImpl) and annotate the class with @objc(…) so the runtime can discover it.
Using the iOS main thread (native EDT)
iOS has a native thread you should use for all calls like Android. Check out the Native EDT on Android section above for reference.
On iOS this is pretty like Android (if you consider objective-c to be similar). This is used for asynchronous invocation:
dispatch_async(dispatch_get_main_queue(), ^{
    // your native code here...
});
You can use this for synchronous invocation, notice the lack of the a in the dispatch call:
dispatch_sync(dispatch_get_main_queue(), ^{
    // your native code here...
});
The problem with the synchronous call is that it will block the caller thread, if the caller thread is the EDT this can cause performance issues and even a deadlock. It’s important to be cautious with this call!
Use Cocoapods for dependencies
Cocoapods are the iOS equivalent of Gradle dependencies.
CocoaPods allow you to add a native library dependency to iOS far more than Gradle. A pod that needs a newer iOS than the rest of your app says so through the ios.pods.platform build hint. The deployment target the build uses is the highest of everything that asks for one — the builder’s own floor, ios.deployment_target, and ios.pods.platform — so that hint can raise the target and never lower it.
Including intercom itself required a single build hint: ios.pods=Intercom which you can obviously extend by using commas to include many libraries. You can search the CocoaPods website for supported 3rd party libraries which includes everything you would expect. One important advantage when working with CocoaPods is the faster build time as the upload to the Codename One website is smaller and the bandwidth you’ve to CocoaPods is faster. Another advantage is the ability to keep up with the latest developments from the library providers.
C (native Windows and native Linux)
The native Windows (win32) and native Linux ports have no JVM: the "clean" ParparVM target compiles your whole app to C and then to a native binary. A native interface on these ports is therefore implemented in plain C rather than C#/Objective-C/Java. The "Generate Native Sources" tool emits one C file per interface:
win/src/main/c/com/mycompany/myapp/MyNativeImplCodenameOne.c(native Windows)linux/src/main/c/com/mycompany/myapp/MyNativeImplCodenameOne.c(native Linux)
The two files are identical, so a native interface written once works on both ports; only the directory differs. (The native Mac target reuses the iOS Objective-C/Swift implementation, because it rides the iOS build.)
The translator emits one C function per interface method. Unlike the Objective-C
stub, the function name is the fully qualified, mangled C symbol the translated app
links against, so don’t rename the functions or change their signatures; just fill
in the bodies. Each function takes the thread state as its first argument and
JAVA_* typed parameters. For example, the interface:
public interface MyNative extends NativeInterface {
    String helloWorld(String hi);
}
This generates the C stub below (returning JAVA_NULL until you implement it):
#include "cn1_globals.h"

JAVA_OBJECT com_mycompany_myapp_MyNativeImplCodenameOne_helloWorld___java_lang_String_R_java_lang_String(CODENAME_ONE_THREAD_STATE, JAVA_OBJECT param1) {
    return JAVA_NULL;
}
Type mapping: the primitives (int, long, boolean, byte, short, char,
float, double) become their JAVA_INT/JAVA_LONG/JAVA_BOOLEAN equivalents;
String, arrays and other objects become JAVA_OBJECT; a void method returns
JAVA_VOID and omits the R suffix in its name; and a
com.codename1.ui.PeerComponent is passed and returned as a JAVA_LONG native peer
handle. Use the core helpers declared in cn1_globals.h (for example
newStringFromCString / stringToUTF8) to convert between C and Java values. As
with the other ports, you can drop additional .c/.h sources and prebuilt
libraries into the same src/main/c directory and they’re compiled into the binary.
JavaScript
Native interfaces in JavaScript look a little different than the other platforms since JavaScript doesn’t natively support threads or classes. The native implementation should be placed in a file with name matching the name of the package and the class name combined where the "." elements are replaced by underscores.
The default generated stubs for the JavaScript build look like this com_mycompany_myapp_MyNative:
(function(exports){

var o = {};

    o.helloWorld__java_lang_String = function(param1, callback) {
        callback.error(new Error("Not implemented yet"));
    };

    o.isSupported_ = function(callback) {
        callback.complete(false);
    };

exports.com_mycompany_myapp_MyNative= o;

})(cn1_get_native_interfaces());
A simple implementation looks like this:
(function(exports){

var o = {};

    o.helloWorld__java_lang_String = function(param1, callback) {
        callback.complete("Hello World!!!");
    }

    o.isSupported_ = function(callback) {
        callback.complete(true);
    };

exports.com_my_code_MyNative = o;

})(cn1_get_native_interfaces());
Notice that you use the complete() method of the provided callback to pass the return value rather than using the return statement. This is to work around the fact that JavaScript doesn’t natively support threads. The Java thread that’s calling your native interface will block until your method calls callback.complete(). This allows you to use asynchronous APIs inside your native method while still allowing Codename One to work use your native interface through a synchronous API.
callback.complete() or callback.error() in your method at some point, or you will cause a deadlock in your app (code calling your native method will sit and "wait" forever for your method to return a value).The naming conventions for the methods themselves are modeled after the naming conventions shown in the previous examples:
<method-name>__<param-1-type>_<param-2-type>_…<param-n-type>
Where <method-name> is the name of the method in Java, and the `<param-X-type>`s are a string representing the parameter type. The general rule for these strings are:
Primitive types are mapped to their type name. (For example:
intto "int,"doubleto "double," etc.).Reference types are mapped to their fully qualified class name with '.' replaced with underscores. For example:
java.lang.Stringwould bejava_lang_String.Array parameters are marked by their scalar type name followed by an underscore and
1ARRAY. For example:int[]would be "int_1ARRAY" andString[]would bejava_lang_String_1ARRAY.
JavaScript examples
Java API:
public interface JavaScriptNativeApi {
    void print(String str);
}
becomes
o.print__java_lang_String = function(param1, callback) {
    console.log(param1);
    callback.complete();
}
Java API:
interface JavaScriptNativeApiAddTwoArgs {
    int add(int a, int b);
}
becomes
o.add__int_int = function(param1, param2, callback) {
    callback.complete(param1 + param2);
}
interface JavaScriptNativeApiAddArray {
    int add(int[] a);
}
becomes
o.add__int_1ARRAY = function(param1, callback) {
    var c = 0, len = param1.length;
    for (var i =0; i<len; i++) {
        c += param1[i];
    }
    callback.complete(c);
}
Native GUI components
PeerComponent return values are automatically translated to the platform native peer as an expected return value. For example: for a NativeInterface method such as this:
interface NativePeerProvider {
    PeerComponent createPeer();
}
Android native implementation would use:
class AndroidPeerImplementation {
    public View createPeer() {
        return null;
    }
}
The iphone would need to return a pointer to a view for example:
- (UIView*)createPeer;
Note that this won’t limit the code from running on an unsupported platform. Only that specific method won’t work.
JavaScript would expect a DOM Element (for example: a <div> tag to be returned.). For example:
o.createHelloComponent_ = function(callback) {
    var c = jQuery('<div>Hello World</div>')
            .css({'background-color' : 'yellow', 'border' : '1px solid blue'});
    callback.complete(c.get(0));
};
Notice that if you want to use a native library (jar,.a file etc.) place it in the resources of the matching platform module — android/src/main/resources, ios/src/main/resources — and it will be packaged into the final executable. You would be able to reference it from the native code and not from the Codename One code, which means you will need to build native interfaces to access it.
This is discussed further below.
Type mapping & rules
Several rules govern the creation of NativeInterfaces and you covered some of them.
The implementation class must have a default public constructor or no constructor at all
Native methods can’t throw exceptions, checked or otherwise
A native method can’t have the name
initas this is a reserved method in Objective-COnly the supported types listed below can be used
Native implementations can’t rely on pass by reference/value semantics as those might change between platforms
hashCode,equals&toStringare reserved and won’t be mapped to native code
| Java | Android | Java SE | Obj-C | C# |
|---|---|---|---|---|
byte | byte | byte | char | sbyte |
boolean | boolean | boolean | BOOL | bool |
char | char | char | int | char |
short | short | short | short | short |
int | int | int | int | int |
long | long | long | long | long |
float | float | float | float | float |
double | double | double | double | double |
String | String | String | NSString* | String |
byte[] | byte[] | byte[] | NSSData* | sbyte[] |
boolean[] | boolean[] | boolean[] | NSData* | bool[] |
char[] | char[] | char[] | NSData | char[] |
short[] | short[] | short[] | NSData* | short[] |
int[] | int[] | int[] | NSData* | int[] |
long[] | long[] | long[] | NSData* | long[] |
float[] | float[] | float[] | NSData* | float[] |
double[] | double[] | double[] | NSData* | double[] |
PeerComponent | android.view.View | PeerComponent | void* | FrameworkElement |
PeerComponent on iOS is void* but UIView is expected as a resultThe examples below show the signatures for this method on all platforms:
interface AllTypesNativeApi {
    void test(byte b, boolean boo, char c, short s,
              int i, long l, float f, double d, String ss,
              byte[] ba, boolean[] booa, char[] ca, short[] sa, int[] ia,
              long[] la, float[] fa, double[] da,
              PeerComponent cmp);
}class AndroidAllTypesImplementation {
public void test(byte param, boolean param1, char param2,
short param3, int param4, long param5, float param6,
double param7, String param8, byte[] param9,
boolean[] param10, char[] param11, short[] param12,
int[] param13, long[] param14, float[] param15,
double[] param16, android.view.View param17) {
}
}-(void)test:(char)param param1:(BOOL)param1
param2:(int)param2 param3:(short)param3 param4:(int)param4
param5:(long long)param5 param6:(float)param6
param7:(double)param7 param8:(NSString*)param8
param9:(NSData*)param9 param10:(NSData*)param10
param11:(NSData*)param11 param12:(NSData*)param12
param13:(NSData*)param13 param14:(NSData*)param14
param15:(NSData*)param15 param16:(NSData*)param16
param17:(void*)param17;o["test__byte_boolean_char_short_int_long_float_double_java_lang_String_byte_1ARRAY_boolean_1ARRAY_char_1ARRAY_short_1ARRAY_int_1ARRAY_long_1ARRAY_float_1ARRAY_double_1ARRAY_com_codename1_ui_PeerComponent"] = function(param1, param2, param3, param4, param5, param6, param7, param8, param9, param10, param11, param12, param13, param14, param15, param16, param17, param18, callback) {
callback.error(new Error("Not implemented yet"));
};class JavaScriptAllTypesImplementation {
public void test(byte param, boolean param1, char param2, short param3, int param4,
long param5, float param6, double param7, String param8, byte[] param9,
boolean[] param10, char[] param11, short[] param12, int[] param13,
long[] param14, float[] param15, double[] param16,
PeerComponent param17) {
}
}Android native permissions
Permissions in Codename One are seamless. Codename One traverses the bytecode and automatically assigns permissions to Android applications based on the API’s used by the developer.
For example, when accessing native functionality this won’t work since native code might require specialized permissions and you don’t/can’t run any serious analysis on it (it can be about anything).
If you require more permissions in your Android native code you need to define them in the build arguments using
android.permission.<PERMISSION_NAME>=true for each permission you want to include. A full list of permissions are listed in Android’s Manifest.permission documentation.
For example:
android.permission.ADD_VOICEMAIL=true
android.permission.BATTERY_STATS=true
...
You can specify the maximum SDK version in which the permission is needed using the android.permission.<PERMISSION_NAME>.maxSdkVersion build hint. You can also specify whether the permission is required for the app to run using the android.permission.<PERMISSION_NAME>.required build hint.
For example:
android.permission.ADD_VOICEMAIL=true
android.permission.BATTERY_STATS=true
android.permission.ADD_VOICEMAIL.required=false
android.permission.ADD_VOICEMAIL.maxSdkVersion=18
...
You can or use the android.xpermissions build hint to inject <uses-permission> tags into the manifest file. For example:
android.xpermissions=<uses-permission android:name="android.permission.READ_CALENDAR" />
Native AndroidNativeUtil
If you do any native interfaces programming in Android you should be familiar with the AndroidNativeUtil class which allows you to access native device functionality more from the native code. For example: many Android APIs need access to the Activity which you can get by calling AndroidNativeUtil.getActivity().
The native util class includes a few other features such as:
runOnUiThreadAndBlock(Runnable)- this is such a common pattern that it was generalized into a public static method. Its identical toActivity.runOnUiThreadbut blocks until the runnable finishes execution.addLifecycleListener/removeLifecycleListener- These essentially provide you with a callback to lifecycle events:onCreateetc. which can be pretty useful for some cases.registerViewRenderer- PeerComponent's are shown on top of the UI since they’re rendered within their own thread outside of the EDT cycle. When you need to show a Dialog on top of the peer you grab a screenshot of the peer, hide it and then show the dialog with the image as the background (the same applies for transitions). Some components (specifically the MapView) might not render and require custom code to implement the transferal to a native Bitmap, this API allows you to do that.
You can work with AndroidNativeUtil using native code such as this:
class NativeCallsImpl {
     public void nativeMethod() {
        AndroidNativeUtil.getActivity().runOnUiThread(new Runnable() {
            public void run() {
               // ...
            }
        });
     }
    // ...
}
Broadcast receiver
A common way to implement features in Android is the BroadcastReceiver API. This allows intercepting operating system events for common use cases.
A good example is intercepting incoming SMS which is specific to Android so you’d need a broadcast receiver to implement that. This is often confusing to developers who sometimes derive the impl class from broadcast receiver. That’s a mistake…
The solution is to place any native Android class into android/src/main/java. It will get compiled with the rest of the native code and "works." You can therefore place this class under android/src/main/java/com/codename1/sms/intercept:
public class SMSListener extends BroadcastReceiver {

    @Override
    public void onReceive(Context cntxt, Intent intent) {
        if (intent.getAction().equals("android.provider.Telephony.SMS_RECEIVED")) {
            Bundle bundle = intent.getExtras();
            SmsMessage[] msgs = null;
            if (bundle != null) {
                try {
                    Object[] pdus = (Object[]) bundle.get("pdus");
                    msgs = new SmsMessage[pdus.length];
                    for (int i = 0; i < msgs.length; i++) {
                        msgs[i] = SmsMessage.createFromPdu((byte[]) pdus[i]);
                        String msgBody = msgs[i].getMessageBody();
                        SMSCallback.smsReceived(msgBody);
                    }
                } catch (Exception e) {
                    Log.e(e);
                    SMSCallback.smsReceiveError(e);
                }
            }
        }
    }
}
The code above is pretty standard native Android code, it’s a callback in which most of the logic is like the native Android code mentioned in this stackoverflow question.
However, there is still more you need to do. To implement this natively you need to register the permission and the receiver in the manifest.xml file as explained in that question. This is how their native manifest looked:
<?xml version="1.0" encoding="utf-8"?>
<manifest xmlns:android="http://schemas.android.com/apk/res/android"
    package="com.bulsy.smstalk1">
    <uses-permission android:name="android.permission.RECEIVE_SMS" />
    <uses-permission android:name="android.permission.READ_SMS" />
    <uses-permission android:name="android.permission.SEND_SMS"/>
    <uses-permission android:name="android.permission.READ_CONTACTS" />

    <application
        android:allowBackup="true"
        android:icon="@mipmap/ic_launcher"
        android:label="@string/app_name"
        android:supportsRtl="true"
        android:theme="@style/AppTheme">
        <activity android:name=".MainActivity">
            <intent-filter>
                <action android:name="android.intent.action.MAIN" />
                <category android:name="android.intent.category.LAUNCHER" />
            </intent-filter>
        </activity>
        <receiver android:name="com.bulsy.smstalk1.SmsListener"
               android:enabled="true"
               android:permission="android.permission.BROADCAST_SMS"
               android:exported="true">
            <intent-filter android:priority="2147483647">//this doesnt work
                <category android:name="android.intent.category.DEFAULT" />
                <action android:name="android.provider.Telephony.SMS_RECEIVED" />
            </intent-filter>
        </receiver>
    </application>
</manifest>
You need the broadcast permission XML and the permission XML. Both are doable through the build hints. The former is pretty easy:
android.xpermissions=<uses-permission android:name="android.permission.RECEIVE_SMS" />
The latter isn’t much harder; notice that many lines have been merged into a single line for convenience:
android.xapplication=<receiver android:name="com.codename1.sms.intercept.SMSListener" android:enabled="true" android:permission="android.permission.BROADCAST_SMS" android:exported="true"> <intent-filter android:priority="2147483647"><category android:name="android.intent.category.DEFAULT" /> <action android:name="android.provider.Telephony.SMS_RECEIVED" /> </intent-filter> </receiver>
Here it’s formatted for readability:
<receiver android:name="com.codename1.sms.intercept.SMSListener"
              android:enabled="true"
              android:permission="android.permission.BROADCAST_SMS"
              android:exported="true">
                   <intent-filter android:priority="2147483647">
                          <category android:name="android.intent.category.DEFAULT" />
                          <action android:name="android.provider.Telephony.SMS_RECEIVED" />
                   </intent-filter>
</receiver>
Listening & permissions
You will notice that these don’t include the actual binding or permission prompts you would expect for something like this. To do this you need a native interface.
The native sample in stack overflow bound the listener in the activity but here you want the app code to decide when you should bind the listening:
public interface NativeSMSInterceptor extends NativeInterface {
    void bindSMSListener();
    void unbindSMSListener();
}
That’s easy!
Notice that isSupported() returns false for all other OSes so you won’t need to ask whether this is "Android" you can use isSupported().
The implementation is pretty easy too:
public class NativeSMSInterceptorImpl {
    private SMSListener smsListener;
    public void bindSMSListener() {
        if (AndroidNativeUtil.checkForPermission(Manifest.permission.RECEIVE_SMS, "We can automatically enter the SMS code for you")) { // (1)
            smsListener = new SMSListener();
            IntentFilter filter = new IntentFilter();
            filter.addAction("android.provider.Telephony.SMS_RECEIVED");
            AndroidNativeUtil.getActivity().registerReceiver(smsListener, filter); // (2)
        }
    }

    public void unbindSMSListener() {
        AndroidNativeUtil.getActivity().unregisterReceiver(smsListener);
    }

    public boolean isSupported() {
        return true;
    }
}
This will trigger the permission prompt on Android 6 and newer. Even though the permission is declared in XML this isn’t enough for 6+. Notice that even when you run on Android 6 you still need to declare permissions in XML!
Here you actually bind the listener, this allows you to grab one SMS and not listen in on every SMS coming through
Native code callbacks
Native interfaces standardize the invocation of native code from Codename One, but it doesn’t standardize the reverse of callbacks into Codename One Java code. The reverse is more complicated since its platform specific and more error prone.
A common "trick" for calling back is to define a static method and then trigger it from native code. This works for Android & Java SE since those platforms use Java for their "native code." Mapping this to iOS requires some basic understanding of how the iOS VM works.
For this explanation lets pretend you have a class called NativeCallback in the src hierarchy under
the package com.mycompany that has the method: public static void callback():
public class NativeCallback {
    public static void callback() {
        // do stuff
    }

    public static void callback(int arg) {
        // do stuff
    }

    public static void callback(String arg) {
        // do stuff
    }

    public static int callbackR(int arg) {
        // do stuff
        return arg;
    }
}
If you want to call it from Android or all the Java based platforms you can write this in the "native" code:
public class NativeCallbackUsage {
    public void invokeCallbacks() {
        NativeCallback.callback();
        NativeCallback.callback("My Arg");
    }
}
You can also pass an argument as you do later on:
public class NativeCallbackUsage {
    public void invokeCallbacks() {
        NativeCallback.callback();
        NativeCallback.callback("My Arg");
    }
}
Accessing callbacks from Objective-C
If you want to invoke that method from Objective-C you need to do the following.
Add an include statement as such:
#include "com_mycompany_NativeCallback.h"
#include "CodenameOne_GLViewController.h"
Notice that the CodenameOne_GLViewController.h include defines various macros such as CN1_THREAD_STATE_PASS_SINGLE_ARG.
Then when you want to trigger the method do:
com_mycompany_NativeCallback_callback__(CN1_THREAD_STATE_PASS_SINGLE_ARG);
CN1_THREAD_GET_STATE_PASS_SINGLE_ARG instead of CN1_THREAD_STATE_PASS_SINGLE_ARG also make sure to add `#include "cn1_globals.h" in the fileThe VM passes the thread context along method calls to save on API calls (thread context is used in Java for synchronization, gc and more).
You can pass arguments like:
public static void callback(int arg) {
    // do stuff
}
Which maps to native as (notice the extra _ before the int):
com_mycompany_NativeCallback_callback___int(CN1_THREAD_GET_STATE_PASS_ARG intValue);
Notice that there is no comma between the CN1_THREAD_GET_STATE_PASS_ARG and the value!
A common use case is passing string values to the Java side, or NSString* which is iOS equivalent. Assuming a method like this:
public static void callback(String arg) {
    // do stuff
}
You would need to convert the NSString* value you already have to a java.lang.String which the callback expects.
The fromNSString function also needs this special argument so you will need to change the method as such:
com_mycompany_NativeCallback_callback___java_lang_String(CN1_THREAD_GET_STATE_PASS_ARG fromNSString(CN1_THREAD_GET_STATE_PASS_ARG nsStringValue));
And you might want to return a value from callback as such:
public static int callbackR(int arg) {
    // do stuff
    return arg;
}
This is tricky since the method name changes to support covariant return types and so the signature would be:
com_mycompany_NativeCallback_callback___int_R_int(intValue);
The upper case R allows you to differentiate between void callback(int,int) and int callback(int).
Object getX() can be overridden by MyObject getX(). For example, in the VM level they can both exist side by side.Accessing callbacks from JavaScript
The mechanism for invoking static callback methods from JavaScript (for the JavaScript port ) is like Objective-C’s. The this object in your native interface method contains a property named $GLOBAL$ that provides access to static Java methods. This object will contain JavaScript mirror objects for each Java class (though the property name is mangled by replacing "." with underscores). Each mirror object contains a wrapper method for its underlying class’s static methods where the method name follows the same naming convention as is used for the JavaScript native methods themselves (and like the naming conventions used in Objective-C).
For example, the Google Maps project includes the static callback method:
class MapContainerCallbacks {
    static void fireMapChangeEvent(int mapId, final int zoom, final double lat, final double lon) {
        // ...
    }
}
It’s defined in the com.codename1.googlemaps.MapContainer class.
This method is called from JavaScript inside a native interface using the following code:
var fireMapChangeEvent = this.$GLOBAL$.com_codename1_googlemaps_MapContainer.fireMapChangeEvent__int_int_double_double;
google.maps.event.addListener(this.map, 'bounds_changed', function() {
    fireMapChangeEvent(self.mapId, self.map.getZoom(), self.map.getCenter().lat(), self.map.getCenter().lng());
});
In this example you first get a reference to the fireMapChangeEvent method, and then call it later. For example, you could have called it directly also.
this.$GLOBAL$.your_class_name.your_method_name or the build server won’t be able to recognize that your code requires this method. The $GLOBAL$ object is populated by the build server with those classes and methods that are used inside your native methods. If the build server doesn’t recognize that the methods are being used (through this pattern) it won’t generate the necessary wrappers for your JavaScript code to access the Java methods.Callbacks of the SMS receiver
The SMS Broadcast Receiver code from before also used callbacks such as this:
package com.codename1.sms.intercept; // (1)

import com.codename1.util.FailureCallback;
import com.codename1.util.SuccessCallback;
import static com.codename1.ui.CN.*;

class SMSCallback {
    static SuccessCallback<String> onSuccess;
    static FailureCallback onFail;

    public static void smsReceived(String sms) {
        if (onSuccess != null) {
            SuccessCallback<String> s = onSuccess;
            onSuccess = null;
            onFail = null;
            SMSInterceptor.unbindListener();
            callSerially(() -> s.onSucess(sms)); // (2)
        }
    }

    public static void smsReceiveError(Exception err) {
        if (onFail != null) {
            FailureCallback f = onFail;
            onFail = null;
            SMSInterceptor.unbindListener();
            onSuccess = null;
            callSerially(() -> f.onError(null, err, 1, err.toString()));
        } else {
            if (onSuccess != null) {
                SMSInterceptor.unbindListener();
                onSuccess = null;
            }
        }
    }
}
Notice that the package is the same as the native code and the other classes. This allows the callback class to be package protected so it isn’t exposed through the API (the class doesn’t have the public modifier)
You wrap the callback in call serially to match the Codename One convention of using the EDT by default. The call will probably arrive on the Android native thread so it makes sense to normalize it and not expose the Android native thread to the user code
Asynchronous callbacks & threading
One of the problematic aspects of calling back into Java from JavaScript is that JavaScript has no notion of multi-threading. If the method you’re calling uses Java’s threads at all (for example: It includes a wait(), notify(), sleep(), callSerially(), etc.) you need to call it asynchronously from JavaScript. You can call a method asynchronously by appending $async to the method name. For example: With the Google Maps example above, you would change :
to
var asyncFireMapChangeEvent = this.$GLOBAL$.com_codename1_googlemaps_MapContainer.fireMapChangeEvent__int_int_double_double$async;
This will cause the call to be wrapped in the appropriate bootstrap code to work with threads - and it’s necessary in cases where the method may use threads of any kind. The side-effect of calling a method with the $async suffix is that you can’t use return values from the method.
Libraries - cn1lib
Support for JAR files in Codename One has been a source of confusion so its probably a good idea to revisit this subject again and clarify all the details.
The first source of confusion is changing the classpath. You should NEVER change the classpath or add an external JAR through the IDE classpath UI. The reasoning here is simple, these IDEs don’t package the JARs into the final executable and even if they did these JARs would probably use features unavailable or inappropriate for the device (for example: java.io.File etc.).
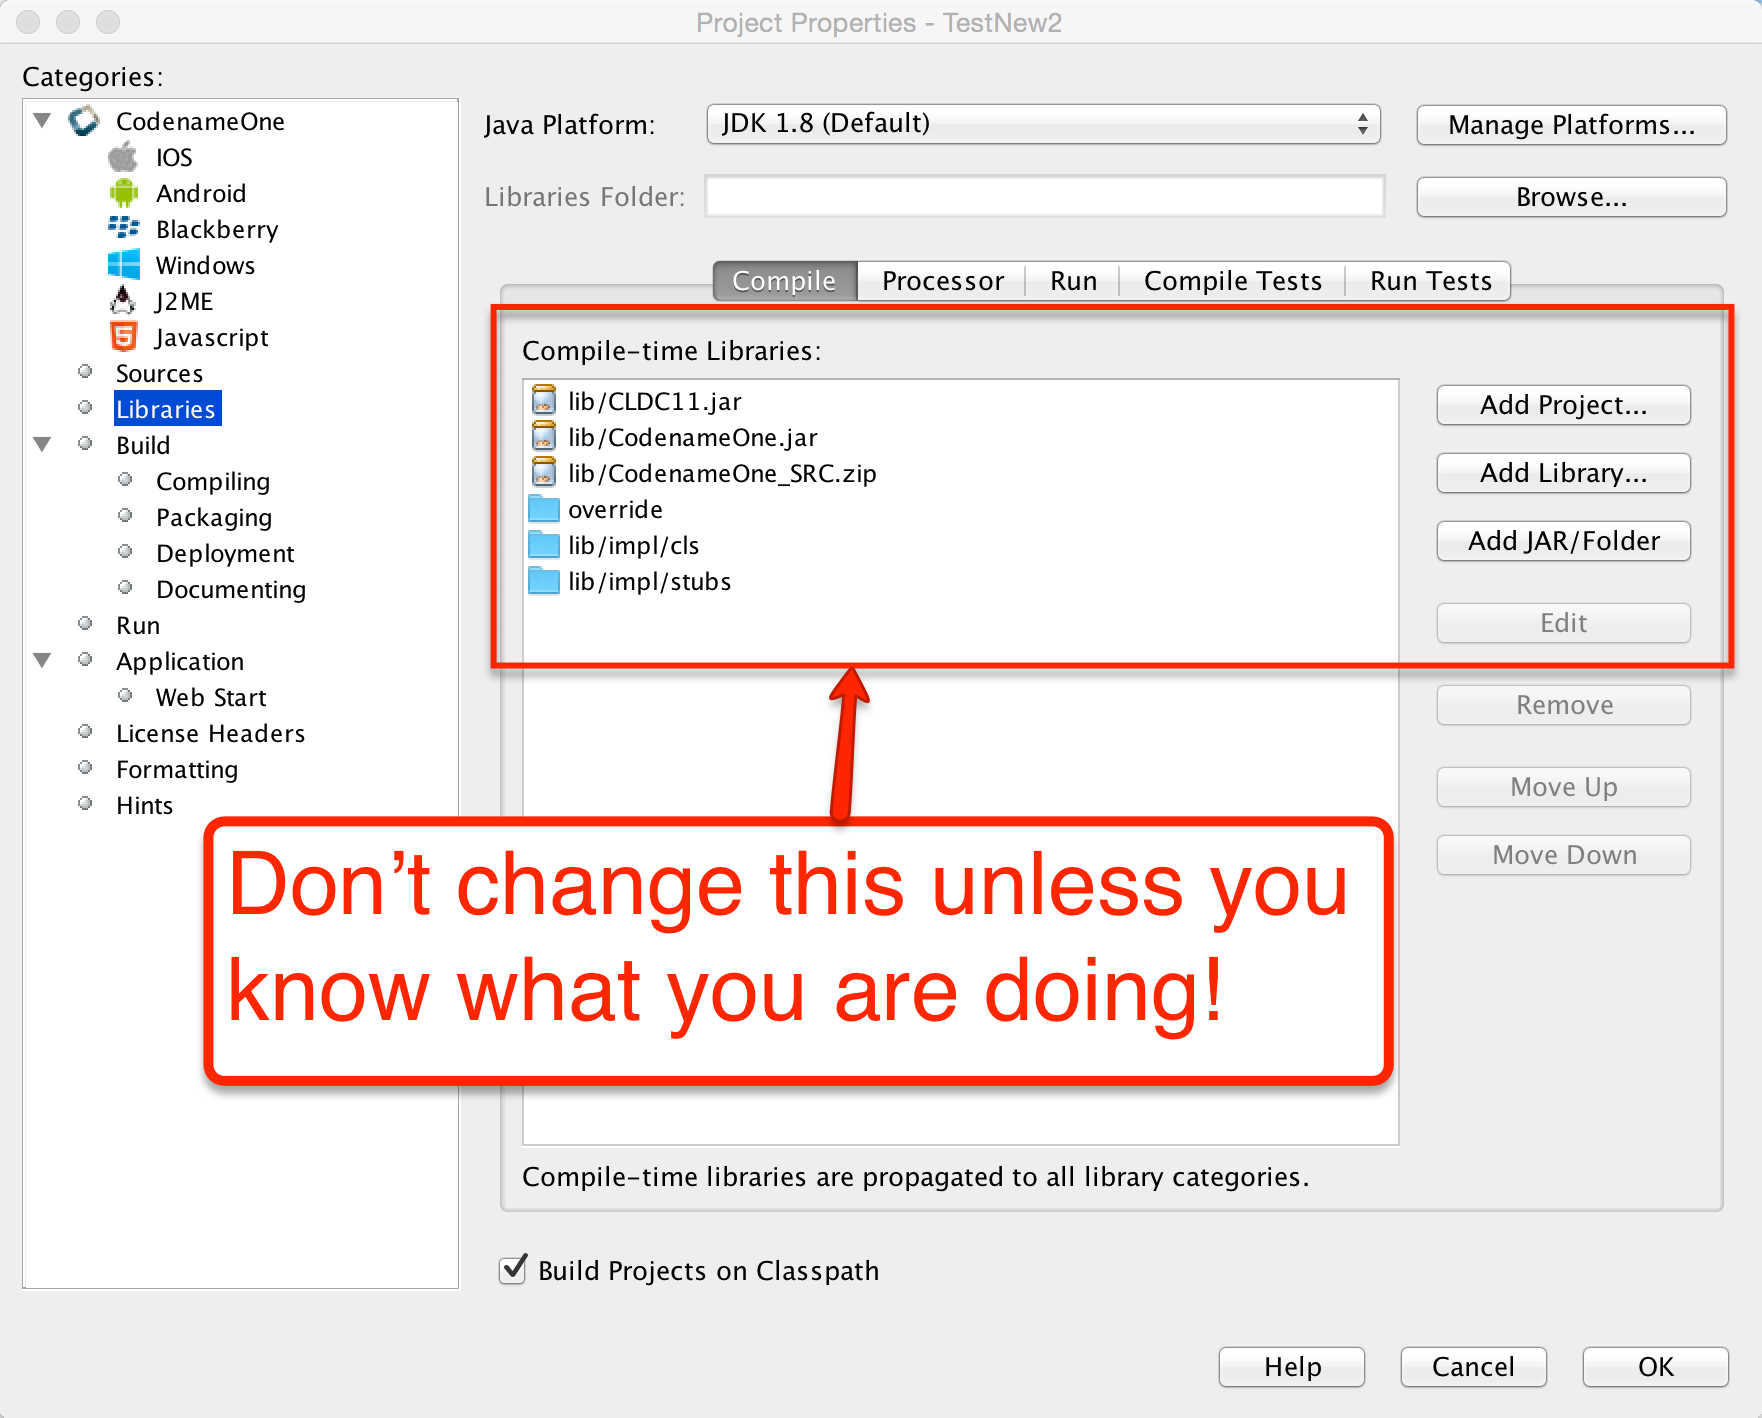
Cn1libs are Codename One’s file format for 3rd party extensions. It’s physically a zip file containing other zip files and some meta-data.
Why not use JAR
A jar can be compiled with usage of any Java API that might not be supported, it can be compiled with a Java target version that isn’t tested.
Jars don’t include support for writing native code; you could use JNI in jars but that doesn’t match Codename One’s needs for native support (see section above).
Jars don’t support "proper" code completion, a common developer trick is to stick source code into the jar but that prevents usage with proprietary code. Cn1libs provide full IDE code completion (with JavaDoc hints) without exposing the sources.
There are two use cases for wanting JARs and they both have different solutions:
Modularity
Working with an existing JARs
Cn1lib’s address the modularity aspect allowing you to break that down. Existing jars can sometimes be used native code settings but you would want to adapt the code to abide by Codename One restrictions.
How to use cn1libs
Codename One has a large repository of 3rd party cn1libs. With the Maven build tool, you consume a cn1lib the same way you consume any other Maven dependency: by adding it to the <dependencies> section of your application’s common/pom.xml file. A typical entry looks like:
<dependency>
    <groupId>com.example</groupId>
    <artifactId>mylib-lib</artifactId>
    <version>1.0.0</version>
    <type>pom</type>
</dependency>
Add the dependency before the <!-- INJECT DEPENDENCIES -→ comment in common/pom.xml. The -lib suffix on the artifactId and the <type>pom</type> declaration are both important - they tell Maven to pull in the library’s "lib" aggregator module rather than a plain jar. See Codename One libraries for the full library-consumption guide.
Creating a simple cn1lib
Codename One libraries are generated from the cn1lib-archetype Maven archetype, which creates a multi-module project containing a common module for your cross-platform Java sources and one module per native platform (iOS, Android, Java SE, JavaScript) for any native interfaces. The detailed walkthrough - command-line, IntelliJ IDEA, NetBeans, and Eclipse - lives in Codename One libraries.
The quickest path from a shell:
mvn archetype:generate \
  -DarchetypeArtifactId=cn1lib-archetype \
  -DarchetypeGroupId=com.codenameone \
  -DarchetypeVersion=LATEST \
  -DgroupId=com.example.mylib \
  -DartifactId=mylib \
  -Dversion=1.0-SNAPSHOT \
  -DinteractiveMode=false
Once the project is generated, add your cross-platform Java sources under common/src/main/java, CSS under common/src/main/css, and run mvn install from the project root to build. The build produces both a Maven artifact for pom-style consumption and a legacy .cn1lib file in common/target for users still on Ant.
Build hints in cn1libs
Some cn1libs are pretty simple to install - just add them as a Maven dependency in common/pom.xml. For example, many of the more elaborate cn1libs need some pretty complex configurations. This is the case when native code is involved where you need to add permissions or plist entries for the various native platforms to get everything to work. This makes the cn1lib’s helpful but less than seamless which is where you want to go.
Codename One cn1libs include two files that can be placed into the root: codenameone_library_required.properties & codenameone_library_appended.properties.
In these files you can write a build hint as codename1.arg.ios.plistInject=… for the various hints.
codename1.arg prefix you would also need to escape reserved characters for properties files.The best way to discover the right syntax for such build hints is to set them through the build hints GUI in a regular project and copy/paste them from
codenameone_settings.properties into the cn1lib file.The obvious question is why do you need two files?
There are two types of build hints: required and appended.
Required build hints can be something like ios.objC=true
which you want to always work. For example: if a cn1lib defines ios.objC=true and another cn1lib defines ios.objC=false
things won’t work since one cn1lib won’t get what it needs…
In this case you’d want the build to fail so you can remove the faulty cn1lib.
ios.objC=true there will be no collision as the value would be identicalAn appended property would be something like ios.plistInject=<key>UIBackgroundModes</key><array><string>audio</string> </array>
Notice that this can still collide for example: if a different cn1lib defines its own background mode. For example, there are many valid cases where ios.plistInject can be used for other things. In this case you will append the content of the ios.plistInject into the build hint if it isn’t already there.
Keep these things in mind:
Properties are merged with every "refresh libs" call not dynamically on the server. This means it should be pretty simple for the developer to investigate issues in this process.
Changing flags is problematic - there is no "uninstall" process. Since the data is copied into the
codenameone_settings.propertiesfile. If you need to change a flag later on you might need to alert users to make changes to their properties essentially negating the value of this feature…
be careful when adding properties here.
It’s your responsibility as a library developer to decide which build hint goes into which file!
Codename One can’t automate this process as the whole process of build hints is by definition an ad hoc process.
The rule of thumb is that a build hint with a numeric or boolean value is always a required property. If an entry has a string that you can append with another string then its probably an appended entry.
These build hints are probably of the "required" type:
android.debug
android.release
android.installLocation
android.licenseKey
android.stack_size
android.statusbar_hidden
android.googleAdUnitId
android.includeGPlayServices
android.headphoneCallback
android.gpsPermission
android.asyncPaint
android.supportV4
android.theme
android.cusom_layout1
android.versionCode
android.captureRecord
android.removeBasePermissions
android.blockExternalStoragePermission
android.min_sdk_version
android.smallScreens
android.streamMode
android.enableProguard
android.targetSDKVersion
android.web_loading_hidden
facebook.appId
facebook.clientToken
ios.keyboardOpen
ios.project_type
ios.newStorageLocation
ios.prerendered_icon
ios.application_exits
ios.themeMode
ios.xcode_version
javascript.inject_proxy
javascript.minifying
javascript.proxy.url
javascript.sourceFilesCopied
javascript.teavm.version
google.adUnitId
ios.includePush
ios.headphoneCallback
ios.enableAutoplayVideo
ios.googleAdUnitId
ios.googleAdUnitIdPadding
ios.enableBadgeClear
ios.locationUsageDescription
ios.bundleVersion
ios.objC
ios.testFlight
ios.metal
desktop.width
desktop.height
desktop.adaptToRetina
desktop.resizable
desktop.fontSizes
desktop.theme
desktop.themeMac
desktop.themeWin
desktop.windowsOutput
noExtraResources
android.permission.<PERMISSION_NAME>
These build hints should probably be appended:
android.xapplication
android.xpermissions
android.xintent_filter
android.facebook_permissions
android.stringsXml
android.style
android.nonconsumable
android.xapplication_attr
android.xactivity
android.pushVibratePattern
android.proguardKeep
android.sharedUserId
android.sharedUserLabel
ios.urlScheme
ios.interface_orientation
ios.plistInject
ios.facebook_permissions
ios.applicationDidEnterBackground
ios.viewDidLoad
ios.glAppDelegateHeader
ios.glAppDelegateBody
ios.beforeFinishLaunching
ios.afterFinishLaunching
ios.add_libs
Integrating Android 3rd party libraries & JNI
While its pretty easy to use native interfaces to write Android native code some things aren’t necessarily as obvious. For example: if you want to integrate a 3rd party library, specifically one that includes native C JNI code this process isn’t as straightforward.
If you need to integrate such a library into your native calls you have the following options:
The first option (and the easiest one) is to place a Jar file in
android/src/main/resources. This will link your binary with the jar file, and the build server picks it up and adds it to the classpath.
Notice that Android release apps are obfuscated by default which might cause issues with such libraries if they reference APIs that are unavailable on Android. You can work around this by adding a build hint to the proguard obfuscation code that blocs the obfuscation of the problematic classes using the build hint:android.proguardKeep=-keep class com.mypackage.ProblemClass { *; }`Another option is the
aarfile is a binary format Google introduced to represent an Android Library project (similarly to the cn1lib format). One of the problem with the Android Library projects was the fact that it required the project sources which made it difficult for 3rd party vendors to publish libraries.
As a result so android introduced theaarfile which is a binary format that represents a Library project. To learn more about arr you can read this.You can link an
aarfile by placing it inandroid/src/main/resourcesand the build server will link it to the project.
.andlib.
That format is gone. The Android builder stops with andlib format is not supported anymore, use aar
instead the moment it finds one, so a project carrying an .andlib doesn’t build at all. Convert it to
an aar.Integrating iOS 3rd party libraries
Reach for ios.pods first. CocoaPods resolves the dependency and its own
dependencies for you, keeps the upload small, and is described in
Using Cocoapods.
Not every SDK is published as a pod, though, and a vendor shipping a static
library and headers can’t be installed that way. Those files go into the ios
module, which packages two directories into the native archive: put anything you
would compile or #import beside your own native sources in
ios/src/main/objectivec, and the vendor’s binaries in ios/src/main/resources.
.hheaders go with the sources, inios/src/main/objectivec..astatic libraries and.bundleresource directories go inios/src/main/resources.A
.frameworkhas to be zipped first, keeping its name, soMyFramework.frameworkis placed asios/src/main/resources/MyFramework.framework.zip.
native/ios instead, which is the layout older material refers to.An SDK usually also expects a handful of the platform’s own frameworks to be
linked. Name those in the ios.add_libs build hint, separated by semicolons. A
good many are linked by default already, so start with the vendor’s list, build,
and add only what the linker actually asks for.
Drag & drop
Unlike other platforms that tried to create overly generic catch all APIs Codename One tried to make things as simple as possible.
In Codename One components can be dragged and drop targets are always components. The logic of actually performing the operation indicated by the drop is the responsibility of the person implementing the drop.
This lightweight dragging never leaves the application. To drag content into another application, onto the desktop or into a file manager — and to accept a drag coming the other way — see Native operating system drag & drop below.
The code below allows you to rearrange the items based on a sensible order. Notice it relies on the default Container drop behavior:
public class RearrangeableItemsDemo {
    public void show() {
        Form hi = new Form("Rearrangeable Items", new BorderLayout());
        String[] buttons = {"A Game of Thrones", "A Clash Of Kings",  "A Storm Of Swords",
            "A Feast For Crows", "A Dance With Dragons", "The Winds of Winter", "A Dream of Spring" };

        Container box = new Container(BoxLayout.y());
        box.setScrollableY(true);
        box.setDropTarget(true);
        java.util.List<String> got = Arrays.asList(buttons);
        Collections.shuffle(got);
        for (String current : got) {
            MultiButton mb = new MultiButton(current);
            box.add(mb);
            mb.setDraggable(true);
        }

        hi.add(BorderLayout.NORTH, "Arrange The Titles").add(BorderLayout.CENTER, box);
        hi.show();
    }
}
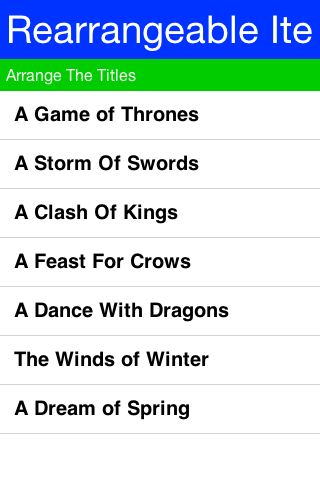
To enable dragging a component it must be flagged as draggable using setDraggable(true), to allow dropping the component onto another component you must first enable the drop target with setDropTarget(true) and override some methods (more on that later).
When dragging on top of a child component of a drop target the code recursively searches for a drop target parent. Dropping a component on the child will automatically find the right drop target, hence there is no need to make "everything" into a drop target.
You can override these methods in the draggable components:
getDragImage- this generates an image preview of the component that will be dragged. This automatically generates a sensible default so you don’t need to override it.drawDraggedImage- this method will be invoked to draw the dragged image at a given location, it might be useful to override it if you want to display some drag related information such as an icon based on location etc. (for example: a move/copy icon).
In the drop target you can override the following methods:
draggingOver- returns true if a drop operation at this point is permitted. Otherwise releasing the component will have no effect.dragEnter/Exit- useful to track and cleanup state related to dragging over a specific component.drop- the logic for dropping/moving the component must be implemented here!
Native operating system drag & drop
The section above moves a component around inside one form. Native dragging hands the gesture to the operating system instead, so a drag can end in another application, on the desktop or in a file manager, and a drag started anywhere on the machine can end on one of your components.
The payload is a ClipboardContent, the same object a copy publishes. That’s the whole idea: a
drag is a copy that the user aims with the pointer, so whatever the application can already put
on the clipboard it can already drag out, and whatever it can paste it can already accept as a
drop. Offering several representations lets one drag land correctly in unrelated applications — a text editor takes the text/html representation, a plain text field takes text/plain, and
the desktop takes the file list.
To drag something out, give the component an operation:
public void showDragSource() {
    Form hi = new Form("Drag Out", BoxLayout.y());
    Label card = new Label("Drag me into another application");

    ClipboardContent content = new ClipboardContent()
            .setData(ClipboardContent.MIME_TEXT, "Dragged out of Codename One")
            .setData(ClipboardContent.MIME_HTML, "<b>Dragged</b> out of Codename One");

    card.setNativeDragOperation(new NativeDragOperation(content)
            .setAllowedActions(NativeDragOperation.ACTION_COPY));

    hi.add(card);
    hi.show();
}
Dragging a file works the same way, except that the file often doesn’t exist yet and the user may drop it nowhere at all. Register it as a provider and it’s written at the moment a receiver asks for it rather than when the drag starts:
public void showFileDragSource() {
    Form hi = new Form("Drag A File Out", BoxLayout.y());
    Label card = new Label("Drag me onto the desktop");

    // The file is promised rather than written. The provider runs when a receiver actually
    // asks for the file list, so a drag the user abandons costs nothing.
    ClipboardContent content = new ClipboardContent()
            .setData(ClipboardContent.MIME_TEXT, "note.txt")
            .setDataProvider(ClipboardContent.MIME_FILE, new ClipboardDataProvider() {
                @Override
                public Object getClipboardData(String mimeType) {
                    return writeNote();
                }
            });

    NativeDragOperation op = new NativeDragOperation(content);
    op.addCompletionListener(e ->
            System.out.println("performed action: "
                    + ((NativeDragOperation) e.getSource()).getPerformedAction()));
    card.setNativeDragOperation(op);

    hi.add(card);
    hi.show();
}

private String writeNote() {
    FileSystemStorage fs = FileSystemStorage.getInstance();
    String path = fs.getAppHomePath() + "note.txt";
    try {
        OutputStream out = fs.openOutputStream(path);
        try {
            out.write("Written on drop\n".getBytes("UTF-8"));
        } finally {
            out.close();
        }
        return path;
    } catch (Exception err) {
        return null;
    }
}
Two platforms can’t defer quite that far. An Android clip has to be complete before the drag begins, so a provider runs there as the drag starts; an iOS drag resolves its file list at the same moment, because the system needs to know how many items the drag carries. Keep a provider cheap enough to run once per drag.
NativeDragOperation.ACTION_MOVE means the receiver takes ownership and the source deletes its
copy. The source only learns whether that happened once the operating system has finished, which
is why the outcome arrives through the completion listener rather than from the call that started
the drag.
Receiving a drop is the mirror image. The deepest component under the pointer that’s a native drop target and accepts the content wins, so a target nested inside another takes precedence and a target that refuses a particular payload lets an ancestor have it:
public void showDropTarget() {
    Form hi = new Form("Drop Here", new BorderLayout());
    Container zone = new Container(BoxLayout.y());
    zone.add(new Label("Drop files here"));

    zone.setNativeDropTarget(true);
    zone.setAcceptedDropMimeTypes(ClipboardContent.MIME_FILE);
    zone.setAcceptedDropActions(NativeDragOperation.ACTION_COPY);
    zone.addNativeDropListener(e -> {
        NativeDropEvent drop = (NativeDropEvent) e;
        for (String path : drop.getFiles()) {
            zone.add(new Label(path));
        }
        zone.getComponentForm().revalidateWithAnimationSafety();
    });

    hi.add(BorderLayout.CENTER, zone);
    hi.show();
}
NativeDropEvent also reports whether the drag started inside this application, which is how a
container that reorders its own items tells that case from an import.
A complete runnable example lives in Samples/samples/NativeDragAndDropSample: one card drags
plain text and HTML together so every receiver takes the best form it knows, another promises a
file that’s written only when a receiver asks for it, and a drop zone describes whatever arrives.
Where it works
Native dragging needs the platform to have it, and platforms differ on whether a drag may leave the application at all — a desktop can drop onto any other window, a tablet can drop into an application beside it, and a phone in full screen has nowhere for a drag to go even though drags within the application still work. Check both before offering the affordance:
public boolean canDragOut() {
    return NativeDragAndDrop.isSupported()
            && NativeDragAndDrop.isDragOutsideApplicationSupported();
}
Where the platform has none of this, the calls are harmless no-ops: the component simply can’t be dragged through the operating system, and the lightweight dragging above is unaffected.
| Platform | Drags | Leaves the app | Notes |
|---|---|---|---|
Desktop (the simulator and "run as desktop app") | yes | yes | Drops onto other windows, the desktop and file managers. Text, HTML, images, arbitrary binary payloads and multiple files. |
Android | yes | Nougat and later | A drag crosses applications through |
iPadOS and Mac Catalyst | yes | yes | Drops into another application beside this one, and into Files or the Finder. |
iPhone | yes | iOS 15 and later | iOS 15 brought dragging between applications to the phone: hold the item with one finger, switch applications with another, drop. Before that the session worked but could only end on one of the application’s own components. |
Everything else | no | no |
|
Threading
Drops arrive on the operating system’s own drag thread rather than the event dispatch thread. The
framework resolves which component a drag is over on that thread, from the accepted MIME types
and actions alone, and dispatches the callbacks — nativeDragEnter, nativeDragOver,
nativeDragExit and nativeDrop — on the event dispatch thread. A filter set through
setAcceptedDropMimeTypes therefore takes effect from the first drag event, while a decision
made inside a callback reaches the cursor one event later.
The one method that runs off the event dispatch thread is canAcceptNativeDrop, which exists for
a target whose answer depends on more than the MIME type. Read the content and the component’s
own configuration there; leave the user interface alone.
Coloring the native Android chrome
Codename One switches the native action bar off — the generated theme sets android:windowActionBar to
false — so the title you see belongs to the
Toolbar or the
SideMenuBar and Codename One draws
it. What’s left for the platform to color is the chrome around your app: the status bar, and the card the
task switcher shows for it.
Define a colors.xml file under android/src/main/resources for that. Every <color> whose name is an
Android theme attribute becomes an android: item in the generated theme:
<resources>
   <color name="colorPrimary">#ff00ff00</color>
   <color name="colorPrimaryDark">#80ff0000</color>
   <color name="colorAccent">#800000ff</color>
</resources>
@color/ resource and never
reaches the theme, and the build log names it. Android Studio puts ordinary app colors such as
ic_launcher_background in this same file, so an imported colors.xml keeps working — but a misspelled
attribute produces no theming, and that log line is where it says so. The names the build accepts are read
from the installed platform, so any android: theme attribute works, not a fixed list.Intercepting URLs on iOS & Android
A common trick in mobile application development, is communication between two unrelated applications.
In Android you can use intents which are pretty elaborate and can be used through Display.execute, but what if you would like to expose the functionality of your application to a different application running on the device. This would allow that application to launch your application.
This isn’t something built into Codename One, but it does expose enough of the platform capabilities to enable that functionality rather on Android.
On Android you need to define an intent filter which you can do using the android.xintent_filter build hint, this accepts the XML to filter whether a request is relevant to your application:
android.xintent_filter=<intent-filter> <action android:name="android.intent.action.VIEW" /> <category android:name="android.intent.category.DEFAULT" /> <category android:name="android.intent.category.BROWSABLE" /> <data android:scheme="myapp" /> </intent-filter>
You can read more about it in this stack overflow question.
To bind the myapp:// URL to your application. As a result typing myapp://x into the Android browser will launch the application.
Passing launch arguments to the app
You can access the value of the URL that launched the app using:
public class RearrangeableItemsDemo {
    public void show() {
        Form hi = new Form("Rearrangeable Items", new BorderLayout());
        String[] buttons = {"A Game of Thrones", "A Clash Of Kings",  "A Storm Of Swords",
            "A Feast For Crows", "A Dance With Dragons", "The Winds of Winter", "A Dream of Spring" };

        Container box = new Container(BoxLayout.y());
        box.setScrollableY(true);
        box.setDropTarget(true);
        java.util.List<String> got = Arrays.asList(buttons);
        Collections.shuffle(got);
        for (String current : got) {
            MultiButton mb = new MultiButton(current);
            box.add(mb);
            mb.setDraggable(true);
        }

        hi.add(BorderLayout.NORTH, "Arrange The Titles").add(BorderLayout.CENTER, box);
        hi.show();
    }
}
This value would be null if the app was launched through the icon.
Android App-to-App contracts (Wallet/Issuer style flows)
Some integrations (wallet provisioning, issuer verification, secure step-up) need more than a URL launch. They require:
a custom Android intent action,
caller validation,
asynchronous app logic (login/back end verification),
a native
setResult(…)response back to the caller.
In Codename One, keep this flow in two layers:
Android bridge activity for contract lifecycle and
setResult(…).Codename One app code for business logic in
start().
Why this isn’t implicitly generated by AndroidGradleBuilder
A generic bridge can’t infer:
expected caller package(s),
required result extra names,
approval/decline mapping rules,
timeout/failure policy.
Those are contract-specific, so the bridge activity is intentionally app-defined.
Registering the bridge activity
Use android.xapplication to inject a dedicated bridge activity and bind the action it should receive:
codename1.arg.android.xapplication=<activity android:name="com.example.wallet.WalletBridgeActivity" android:exported="true" android:launchMode="singleTop" android:noHistory="true" android:excludeFromRecents="true" android:theme="@android:style/Theme.Translucent.NoTitleBar"><intent-filter><action android:name="com.example.wallet.ACTION_VERIFY"/><category android:name="android.intent.category.DEFAULT"/></intent-filter></activity>
Keep codename1.arg.android.activity.launchMode=singleTask on your main CN1 activity so app resume behavior is predictable.
Bridge activity responsibilities
A minimal bridge activity should:
Receive and parse the incoming intent.
Capture caller identity using
getCallingPackage().Launch or resume the CN1 app activity.
Hold contract state until CN1 completes verification.
Return
setResult(…)andfinish().
getCallingPackage() as verified identity.
Don’t rely on referrer extras for caller authentication because callers can spoof those values.
This implies the contract should be launched with startActivityForResult(…) so caller identity is available.Optional native Android example for certificate fingerprint verification (called from bridge/native layer before trusting caller):
public static boolean isTrustedCallerSignature(Context ctx, String packageName, Set<String> allowedSha256) {
    if (ctx == null || packageName == null || packageName.isEmpty() || allowedSha256 == null || allowedSha256.isEmpty()) {
        return false;
    }
    try {
        PackageManager pm = ctx.getPackageManager();
        PackageInfo info;
        if (Build.VERSION.SDK_INT >= 28) {
            info = pm.getPackageInfo(packageName, PackageManager.GET_SIGNING_CERTIFICATES);
            Signature[] sigs = info.signingInfo != null
                    ? info.signingInfo.getApkContentsSigners()
                    : null;
            return hasAllowedFingerprint(sigs, allowedSha256);
        } else {
            info = pm.getPackageInfo(packageName, PackageManager.GET_SIGNATURES);
            return hasAllowedFingerprint(info.signatures, allowedSha256);
        }
    } catch (PackageManager.NameNotFoundException | NoSuchAlgorithmException ex) {
        return false;
    }
}

private static boolean hasAllowedFingerprint(Signature[] sigs, Set<String> allowedSha256)
        throws NoSuchAlgorithmException {
    if (sigs == null) {
        return false;
    }
    MessageDigest md = MessageDigest.getInstance("SHA-256");
    for (Signature s : sigs) {
        String fp = toHex(md.digest(s.toByteArray()));
        if (allowedSha256.contains(fp)) {
            return true;
        }
    }
    return false;
}

private static String toHex(byte[] data) {
    char[] digits = "0123456789ABCDEF".toCharArray();
    StringBuilder out = new StringBuilder(data.length * 2);
    for (byte b : data) {
        int value = b & 0xff;
        out.append(digits[value >>> 4]);
        out.append(digits[value & 0x0f]);
    }
    return out.toString();
}
public class WalletBridgeActivity extends Activity {
    private static WeakReference<WalletBridgeActivity> active;

    @Override
    protected void onCreate(Bundle savedInstanceState) {
        super.onCreate(savedInstanceState);
        active = new WeakReference<>(this);

        Intent in = getIntent();
        String caller = getCallingPackage();
        String payload = in == null ? null : in.getStringExtra("payload");

        Intent launch = getPackageManager().getLaunchIntentForPackage(getPackageName());
        if (launch == null) {
            finish();
            return;
        }
        launch.addFlags(Intent.FLAG_ACTIVITY_NEW_TASK | Intent.FLAG_ACTIVITY_CLEAR_TOP | Intent.FLAG_ACTIVITY_SINGLE_TOP);
        launch.putExtra("wallet_payload", payload);
        launch.putExtra("wallet_caller", caller == null ? "" : caller);
        startActivity(launch);
        // Do not finish yet. CN1 will finish this activity via native callback once verification completes.
    }

    @Override
    protected void onDestroy() {
        WalletBridgeActivity current = getActive();
        if (current == this) {
            active = null;
        }
        super.onDestroy();
    }

    public static WalletBridgeActivity getActive() {
        return active == null ? null : active.get();
    }
}
Reading contract data in start()
Codename One exposes launch metadata through AppArg and Display properties. Read these in start():
AppArg(primary launch payload)android.intent.actionandroid.intent.dataandroid.intent.typeandroid.intent.callerandroid.intent.caller.verifiedandroid.intent.extra.<KEY>
public void start() {
    Display d = Display.getInstance();
    String action = d.getProperty("android.intent.action", null);
    if ("com.example.wallet.ACTION_VERIFY".equals(action)) {
        boolean callerVerified = "true".equals(d.getProperty("android.intent.caller.verified", "false"));
        String payload = d.getProperty("android.intent.extra.wallet_payload", d.getProperty("AppArg", null));
        String caller = d.getProperty("android.intent.caller", "");

        if (!callerVerified || !isAllowedCaller(caller)) {
            failClosed(); // return declined/canceled via bridge completion API
            return;
        }

        verifyWalletPayload(payload, caller);
        return;
    }
    showMainForm();
}
Returning results to the wallet API
Implement a small native interface method (Android implementation) that:
gets
WalletBridgeActivity.getActive(),verifies
getActive()is non-null and fails closed if the bridge timed out/canceled,builds caller-specific result extras,
calls
setResult(Activity.RESULT_OK, resultIntent),calls
finish()on the bridge activity.
This is where you bind to the wallet contract’s exact response schema. Keep these extra names in one place so upgrades are manageable.
Foreground behavior on Android 14/15
Foreground transitions are best-effort because Android may block background launches in some states. Build for:
immediate resume when allowed,
notification fallback when blocked.
iOS is practically identical to Android with some small caveats, iOS’s equivalent of the manifest is the plist.
You can inject more data into the plist by using the ios.plistInject build hint.
The equivalent on the iOS side would be:
ios.plistInject=<key>CFBundleURLTypes</key> <array> <dict> <key>CFBundleURLName</key> <string>com.yourcompany.myapp</string> </dict> <dict> <key>CFBundleURLSchemes</key> <array> <string>myapp</string> </array> </dict> </array>
For example, that can conflict with the Facebook integration if you use FacebookConnect which needs access to the schemes. To work around this you can use the build hint ios.urlScheme for example:
ios.urlScheme=<string>myapp</string>
Native peer components
Many Codename One developers don’t truly grasp the reason for the separation between peer (native) components and Codename One components. This is a crucial thing you need to understand if you plan on working with native widgets for example: Web Browser, native maps, text input, media and native interfaces (which can return a PeerComponent).
Codename One draws all its widgets on its own, this is a concept which was modeled in part after Swing. This allows functionality that can’t be achieved in native widget platforms:
The Codename One GUI builder & simulator are almost identical to the device - notice that this also enables the build cloud, otherwise device specific bugs would overwhelm development and make the build cloud redundant.
Ability to override everything - paint, pointer, key events are all overridable and replaceable. Developers can also paint over everything for example: glasspane and layered pane.
Consistency - provides identical functionality on all platforms.
This all contributes to your ease of working with Codename One and maintaining Codename One. More than 95% of Codename One’s code is in Java hence its portable and pretty easy to maintain!
Why does Codename One need native widgets at all
You need the native device to do input, html rendering etc. These are too big and too complex tasks for Codename One to do from scratch.
They’re sometimes impossible to perform without the native platform. For example: the virtual keyboard input on the devices is tied directly to the native text input. It’s impractical to implement everything from scratch for all languages, dictionaries etc. The result would be sub-par.
A web browser can’t be implemented in this age without a JavaScript JIT and including a JIT within an iOS app is prohibited by Apple.
Problems with native widgets
Codename One does pretty much everything on the EDT (Event Dispatch Thread), this provides a lot of cool features for example: modal dialogs, invokeAndBlock etc.
For example native widgets have to be drawn on the devices native UI thread.
The oldest answer to that was to paint in two passes: loop over the Codename One components and paint
them, then loop over the native peers and let the platform paint those over the result. That’s where
the rule that a peer always covers whatever sits under it comes from, and it isn’t how the current
ports work.
Display asks the implementation one question, paintNativePeersBehind(), and a false answer
doesn’t mean the peer can’t be covered. It leaves the compositing to the port, and the ports differ:
iOS and the JavaScript port answer
true. The native layer sits underneath and Codename One paints above it, punching a hole through its own surface withclearRectwherever a peer belongs.Android hands the peer’s native
Viewto the same ordered stream of drawing operations as every other component, so a component painted after the peer covers it. The simulator does the same for a peer that renders into a buffer.Where the peer owns a surface of its own, the system composites that surface and paint order never reaches it. The screenshot technique below can’t reach it either, for the same reason.
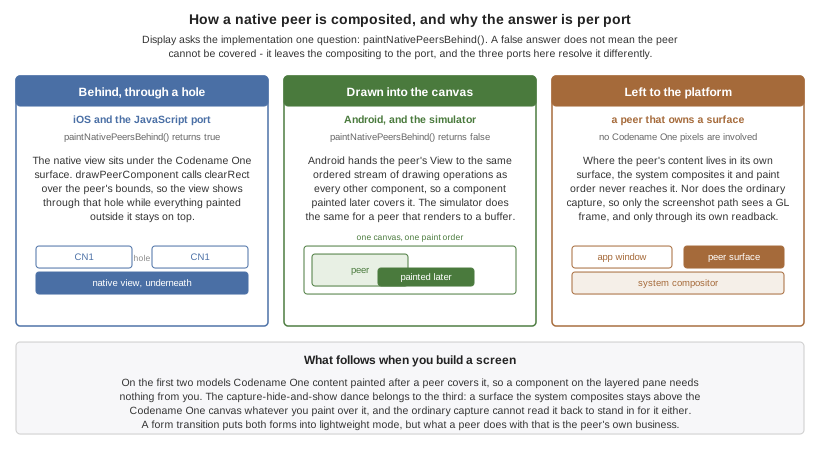
Showing dialogs on top of peer components
Under the first two models this needs nothing from you: a Dialog paints after the peer and covers it.
What follows is for the third, where the system composites the peer’s own surface and no amount of
painting reaches it.
A form transition tells the peers about itself without any help from you: initTransition puts both
forms into lightweight mode, which is how the framework says that a peer isn’t truly visible for a
while. How a peer responds is left to the peer, and it varies by port. Codename One grabs a screenshot of the peer, hide it and then you can show the screenshot. Since the screenshot is static it can be rendered through the standard UI. You can’t do that always since grabbing a screenshot is an expensive process on all platforms and must be performed on the native device thread.
PeerComponent declares that callback empty, so a port opts into the still by overriding it. The iOS
and Android peers do, and on Android what the still contains varies again: the browser peer overrides
the capture and draws its WebView into the bitmap, the default renders the View the ordinary way,
and a peer that owns a surface has nothing there to render, so its still is blank. That doesn’t hide the
peer, though. In super peer mode setLightweightMode only generates the image, it never changes the
view’s visibility, and AndroidGLSurface asks for setZOrderMediaOverlay(true), so the live surface goes
on drawing above the Codename One canvas while a blank still is painted into the canvas underneath it.
The transition animates around a peer that never moved. The OpenGL peer keeps a copy of each frame read back with glReadPixels,
but that copy feeds the screenshot path rather than the peer’s still image, so it doesn’t cover this.
The JavaScript peer overrides nothing, so it stays live throughout.
Why can’t you combine peer component scrolling and Codename One scrolling
Since the form title/footer etc. Are drawn by Codename One the peer component might paint itself on top of them. Clipping a peer component is often pretty difficult. Furthermore, if the user drags his finger within the peer component he might trigger the native scroll within the might collide with your scrolling?
Native components in the first Form
Another problem might be counterintuitive. iOS has screenshot images representing the first form. If your first page is an HTML or a native map (or other peer widget) the screenshot process on the build server will show fallback code instead of the real thing thus providing sub-par behavior.
Its impractical to support something like HTML for the screenshot process since it would also look different from the web component running on the device.
Building your own Layout manager
A Layout contains all the logic for positioning Codename One components. It essentially traverses a Codename One Container and positions components based on internal logic.
When you build the layout you need to take margin into consideration and make sure to add it into the position/size calculations. Building a layout manager involves two simple methods: layoutContainer & getPreferredSize.
layoutContainer is invoked whenever Codename One decides the container needs rearranging, Codename One tries to avoid calling this method and invokes it at the last possible moment. Since this method is expensive (imagine the recursion with nested layouts). Codename One marks a flag indicating layout is "dirty" when something important changes and tries to avoid "reflows."
getPreferredSize allows the layout to determine the size desired for the container. This might be a difficult call to make for some layout managers that try to provide both flexibility and simplicity.
Most of FlowLayout bugs stem from the fact that this method is impossible to implement efficiently for all the use cases of a nested FlowLayout. The size of the final layout won’t necessarily match the requested size (it probably won’t) but the requested size is taken into consideration, when scrolling and also when sizing parent containers.
This is a layout manager that arranges components in a center column aligned to the middle. You then show the proper usage of margin to create a stair like effect with this layout manager:
class CenterLayout extends Layout {
    public void layoutContainer(Container parent) {
        int components = parent.getComponentCount();
        Style parentStyle = parent.getStyle();
        int centerPos = parent.getLayoutWidth() / 2 + parentStyle.getMargin(Component.LEFT);
        int y = parentStyle.getMargin(Component.TOP);
        boolean rtl = parent.isRTL();
        for (int iter = 0; iter < components; iter++) {
            Component current = parent.getComponentAt(iter);
            Dimension d = current.getPreferredSize();
            Style currentStyle = current.getStyle();
            int marginRight = currentStyle.getMarginRight(rtl);
            int marginLeft = currentStyle.getMarginLeft(rtl);
            int marginTop = currentStyle.getMarginTop();
            int marginBottom = currentStyle.getMarginBottom();
            current.setSize(d);
            int actualWidth = d.getWidth() + marginLeft + marginRight;
            current.setX(centerPos - actualWidth / 2 + marginLeft);
            y += marginTop;
            current.setY(y);
            y += d.getHeight() + marginBottom;
        }
    }

    public Dimension getPreferredSize(Container parent) {
        int components = parent.getComponentCount();
        Style parentStyle = parent.getStyle();
        int height = parentStyle.getMargin(Component.TOP) + parentStyle.getMargin(Component.BOTTOM);
        int marginX = parentStyle.getMargin(Component.RIGHT) + parentStyle.getMargin(Component.LEFT);
        int width = marginX;
        for (int iter = 0; iter < components; iter++) {
            Component current = parent.getComponentAt(iter);
            Dimension d = current.getPreferredSize();
            Style currentStyle = current.getStyle();
            width = Math.max(d.getWidth() + marginX + currentStyle.getMargin(Component.RIGHT)
                    + currentStyle.getMargin(Component.LEFT), width);
            height += currentStyle.getMargin(Component.TOP) + d.getHeight()
                    + currentStyle.getMargin(Component.BOTTOM);
        }
        Dimension size = new Dimension(width, height);
        return size;
    }
}

public class CenterLayoutDemo {
    public static Form createForm() {
        Form hi = new Form("Center Layout", new CenterLayout());
        for (int iter = 1; iter < 10; iter++) {
            Label l = new Label("Label: " + iter);
            l.getUnselectedStyle().setMarginUnit(Style.UNIT_TYPE_DIPS);
            l.getUnselectedStyle().setMarginLeft(iter * 4);
            l.getUnselectedStyle().setMarginRight(0);
            hi.add(l);
        }
        hi.add(new Label("Really Wide Label Text!!!"));
        return hi;
    }

    public void show() {
        createForm().show();
    }
}
Porting a Swing/AWT Layout manager
The GridBagLayout was ported to Codename One considering the complexity of that specific layout manager. Here are some tips you should consider when porting a Swing/AWT layout manager:
Codename One doesn’t have
Insets, but adds some support for them to port GridBag but components in Codename One have a margin they need to consider instead of theInsets(the padding is in the preferred size and is thus hidden from the layout manager).AWT layout managers also synchronize a lot on the AWT thread. This is no longer necessary since Codename One is single threaded, like Swing.
AWT considers the top left position of the
Containerto be 0,0 whereas Codename One considers the position based on its parentContainer. The top left position in Codename One isgetX(),getY().
Other than those things it’s fixing method and import statements, which are slightly different. Pretty trivial stuff.
Update framework
When Codename One launched in 2012 there was a need to ship updates and fixes faster than the plugin update system, leading to the client lib update system. There was also a need to update the designer tool (resource editor), the GUI builder, and the skins, as well as the built-in builder code (CodeNameOneBuildClient.jar).
The Update Framework solves many problems in the old systems:
Download once - if you have many projects the library will download once to the
.codenameonedirectory. All the projects will update from local storageSkins update automatically - this is hugely important. When you change a theme you need to update it in the skins and if you don’t update the skin you might see a difference between the simulator and the device
Update of designer tools without an IDE plugin update - The IDE plugin update process is slow and tedious. This way a GUI builder fix can ship without a new IDE plugin release. The standalone Settings artifact is versioned with the Maven plugin instead.
This framework should be seamless. You should no longer see the "downloading" message whenever you push an update after your build client is updated. Your system would poll for a new version daily and update when new updates are available.
To force an update check, run mvn cn1:update from the project root.
How does it work
mvn cn1:update does two separate things.
First it makes sure ~/.codenameone/UpdateCodenameOne.jar is there — installed
from a resource bundled in the plugin, or downloaded if that resource is missing — and runs it. That’s what keeps the shared tooling and the device skins under
~/.codenameone current, and it’s why the download happens once per machine
rather than once per project. It no longer runs against your project directory,
which is why a Maven project has no jars of its own to update: the plugin hands it
a synthetic directory under common/target/codenameone/update-dummy, seeded with
the project’s codenameone_settings.properties. It’s under common because that
module holds codenameone_settings.properties and is therefore the one the plugin
treats as the Codename One project; run from the root, the aggregator skips itself
and common does the work.
Then it reads the plugin’s Maven metadata, resolves the newest published release
and rewrites the cn1.version and cn1.plugin.version properties in the pom.
Which metadata it reads depends on the project. Releases are published to
the Codename One repository, and the mojo
uses it only when the project declares that host in BOTH <repositories> and
<pluginRepositories>. A project that declares it in one section only, or in
neither, is offered what Maven Central holds instead — and Central keeps every
version published before the cutover but receives no new ones, so such a project
is told it’s up-to-date at the last pre-cutover release however long it waits. The build log says so
when it happens. Adding the repository to both sections is the fix. The framework and plugin artifacts for that version then
resolve on the next build like any other dependency. The Resource Editor doesn’t:
it’s a separate artifact of around 43MB that’s fetched when you run
mvn cn1:designer.
A project pinned to a -SNAPSHOT keeps its version, because a snapshot already
tracks the newest build. To move to a particular release rather than the newest
one, name it: mvn cn1:update -DnewVersion=X.Y.Z.
What isn’t covered
You will notice 3 big things that aren’t covered in this unified framework:
You don’t update cn1libs - whether you would like to update them automatically is unclear
Versioned builds - a lot of complexity exists in the versioned build system. This might be something you address in the future but for now the framework stays simple.